Feature:
Web-Wayfinder

Always on the right track with the MPskin 
Web-Wayfinder


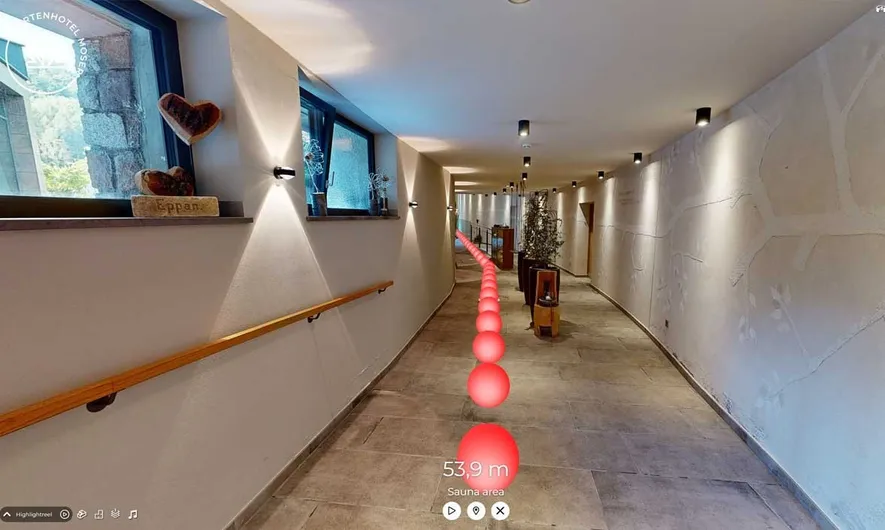
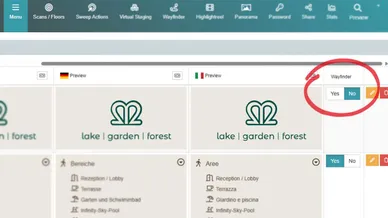
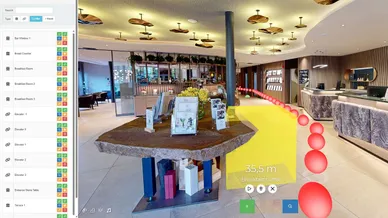
The Web-Wayfinder is an automatic navigation tool that helps users find their way through the Matterport space! When activated, it generates a guided path from the current location to the selected destination. Visitors can either follow the path manually or use the autoplay functionality.


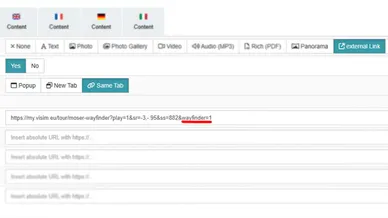
Both deeplinks and tags can be used with the Wayfinder, without time-consuming manual configuration! 

Setup in the Menu

The easiest way to use the Wayfinder is directly in the menu! 
Navigate to the menu editor in the backend of the skin and activate the wayfinder for one or more menu blocks - you can find the settings on the right side of each block. 
Once activated, the Wayfinder will start in the tour as soon as the user clicks on a tag or deep link in the menu, provided the Wayfinder has been activated for the corresponding block. 

Setup as Click Action

Individual deeplinks can also launch the Wayfinder! To do this, drag a deep link from the skin and add the URL parameter "&wayfinder=1" to the end of the URL. 
This wayfinder deeplink can then be used as a click action on a virtual staging object or as a sweep action. 
Here is an example of such a deeplink: https://my.mpskin.com/tour/moser-wayfinder?play=1&sr=2.41,-1.49&ss=739&wayfinder=1  
 

Wayfinding-Editor

Wayfinding can be optimized using the Wayfinding Editor. By default, all paths in the Wayfinder are generated automatically - if the path goes through walls, over balconies, or through windows at certain points, a "Blocker" can be placed at those points. Where blockers are placed, the Wayfinder will not be able to navigate.

"Teleports" can be used to configure specific routes with an entry and exit point. Teleports are mainly used to bypass blocked areas and for elevators - for example, you can place a teleport next to the elevator on all floors. The individual teleport objects can then be linked together (like a chain). 

Webinar: Web-Wayfinder

FAQs about the Web-Wayfinder

In which plans is the Web-Wayfinder available?

The Web Wayfinder is included in the BUSINESS and PRO plans. 

What do the three buttons at the bottom do (after activating the Wayfinder in the tour)?

When the Wayfinder has been activated, users will see three different buttons at the bottom of the screen:

▶️ The Play button starts an automatic tour that guides the user along the path to the destination.
📍 The pin button allows the user to jump directly to the selected position without having to follow the path manually or automatically. 
✖️ The X button closes the Wayfinder.

After starting the Wayfinder, I see “0m” - what is the problem?

If the Wayfinder displays 0m, it means that it cannot find a way to the destination. This happens when either mesh fragments block the path or there is no complete mesh between the start and destination points. 
In such cases, teleports must be placed in the Wayfinder to bridge the hole or missing mesh.

To do this, place a teleport in front and behind the "problem area". Note that teleports must always touch a sweep point! 
See the next section for more information on teleports.

How exactly do I use teleports?

Teleports are used in the wayfinding editor when the wayfinder cannot generate a path due to mesh being in the way, or to implement elevators. In case of path display problems ("0m"), they can be used to "bridge" areas blocked by mesh.

Place a teleport at the start and end point of the desired path. Note that the teleport must always touch a scan point! 
You can then connect the two teleports, e.g. by configuring teleport 1 on teleport 2 as a "target object".

If more than two teleports are used for a route, e.g. in the case of a multi-storey elevator, all teleports are linked together like a chain. 
For example, in a four-story building with one elevator, it would look like this:

  • Teleport 1 (Floor 1) - Target Object: Teleport 2
  • Teleport 2 (Floor 2) - Target Object: Teleport 3
  • Teleport 3 (Floor 3) - Target Object: Teleport 4
  • Teleport 4 (Floor 4)
Where can I switch between the display in meters and feet?

You can find the settings for the units used under “Settings < Codes < Wayfinder” (bottom left). 

The Wayfinder cuts through walls/windows/objects in the tour, what do I have to do?

If the Wayfinder cuts through certain areas in the tour, you can place a “blocker” in the affected area. The blocker ensures that the Wayfinder can no longer navigate the blocked area.

Such problems often occur if there is no mesh in the affected area or if it the mesh has gaps. 

How do I activate the Wayfinder only for certain deep links, not an entire menu block?

In addition to enabling the wayfinder for an entire menu block, you can also enable it for individual deep links. 
Simply add the URL parameter "&wayfinder=1" to the deep link. 
Wayfinder deep links can then be used both in the menu and as a click action, e.g. to launch the Wayfinder by clicking on a virtual staging icon.

This way, the wayfinder can also be enabled for just one language, for example - just add the URL parameter to the individual deep links in the menu. 

Can the color of the waypoints and the speed of the automatic walkthrough be changed?

Unfortunately, no - but if there is a high demand for this kind of functionality, we may implement it in the future. 

Start your creative journey with MPskin!